One common question we receive from new TestRail users is: “How do I trace requirements using TestRail?” Sometimes, folks even specifically ask, “Does TestRail support RTM (Requirements Traceability Matrix) to trace the test coverage?”
In this post, you will learn:
- What does “traceability” actually mean?
- Why traceability is important, and what are its limitations?
- What is a Requirements Traceability Matrix (“RTM”)?
- How to start tracking traceability with a simple Excel or Google Sheets file?
- How to create a traceability report in TestRail?
- How to create a traceability report in TestRail with Jira issues?
What do we mean by “traceability”?
As per Wikipedia, traceability is the capability to trace something. In some cases, it is interpreted as the ability to verify the history, location, or application of an item by means of documented recorded identification.
In IT and Software Engineering, traceability usually refers to the ability to track a business requirement across different stages of the development lifecycle like requirement gathering, design, development, testing, and maintenance.
Traceability works by linking different artifacts like requirements/user stories/epics to their corresponding test cases, test runs, test execution results (including defect details if any) and vice versa.
Why traceability is important / Goal of RTM
Requirements traceability ensures that requirements are met and we have built and tested the product correctly.
Increasing test coverage reduces defect leakages / QA misses (before the product is released to the world), and a RTM establishes a way to verify that we (as a testing team) have adequate coverage built into our test planning and execution.
Traceability also helps create a snapshot to identify coverage gaps and gives us visibility throughout the development lifecycle, thus accelerating the development and reducing waste of resources like time and effort. In this capacity, we can start to track coverage as a metric that helps us determine the number of tests Run, Passed, Failed, or Blocked, etc., for every requirement, thus providing a brief overview of the current health of the development project.
Moreover, traceability also plays an essential role in analyzing the impact when any related artifacts (like requirements, test cases) change. For example, if our requirement with the ID R01 changes, its related test cases T01 and T02 need to be modified to keep the document consistent.
Ultimately, the goal for traceability is to help you plan and manage testing activities (including defect management) better.
What is a Requirements Traceability Matrix (“RTM”)?
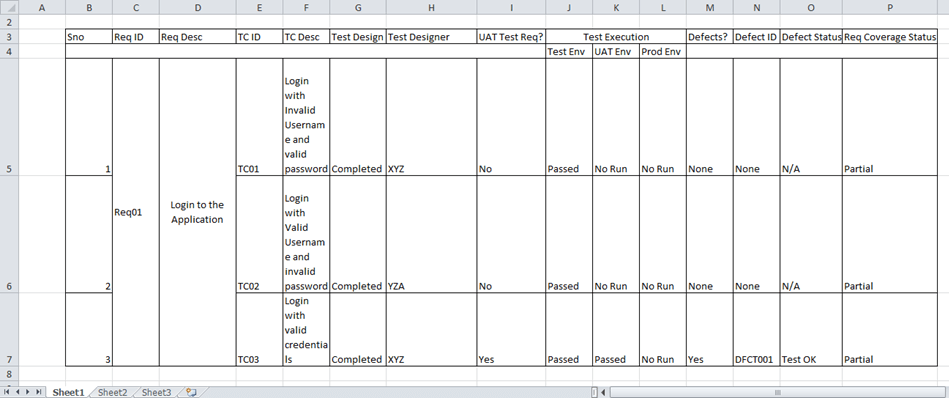
Usually, when someone refers to “RTM” in context of software testing, they are referring to a worksheet—usually produced in an Excel workbook or Google Sheets—that contains the requirements for their project with all its possible test scenarios and cases and their current state (i.e., if they have been passed or failed).
Let’s consider a scenario where we have the following business requirement like “User should be able to sign up using email and Facebook” with 2 test cases that are part of Sprint 1, namely:
1. T01: Sign up using Email
2. T02: Sign up using Facebook
As an example, let’s say that when these test cases were executed, the results were Passed and Failed respectively. In this case, the basic traceability document might look like this :

From this snapshot, we can gather a lot of information at a glance, like:
- The ‘Sign up using Facebook’ feature was part of Sprint 1 which failed during execution and the defect/issue ID for the same is D1.
- Also, the test case T02 was designed on the basis of R01 requirement/user story.
How to start tracking traceability with a simple Excel or Google Sheets file
It’s quite simple to create a basic RTM document. The steps are as follows :
Step 1: Define your goal (To make sure you’re gathering the right information for your traceability matrix)
Ex: I want to create a traceability matrix so that I know which tests and issues are impacted if a requirement changes.
Step 2: Gather all the artifacts (Like Requirements, Test Cases, Test Results, Issues / Bugs)
Step 3: Create a template for RTM (Add a column for each of the artifacts)
Step 4: Add Requirements from the Requirement Document (Add Requirements IDs and Description)
Step 5: Add Test Cases from Test Cases Document (Add Test cases corresponding to the Requirements mentioned in Step 4)
Step 6: Add Test Results and Issues, if any (Add the test results corresponding to test cases mentioned in Step 5 and any defects associated with them).
Step 7: Update the matrix – as and when required (Whenever there is a change in any of the artifacts, update the matrix so that it reflects the current health of the project)
Here is what a typical traceability matrix might look like in a simple Excel or Google Spreadsheet (although there would usually be more columns than this for various iterations over a project):
Limitations of RTM in Excel
Excel can provide a quick, easy way to create an RTM matrix because of our familiarity with this tool, but the maintenance of RTM in Excel is a tedious job. It will take a significant amount of manual work to get the desired output. For example:
- As the number of requirements grows, the number of columns in the sheet grows too.
- Every time an artifact changes, we have to manually update the matrix, which is time-consuming and is also prone to manual errors.
If the matrix doesn’t reflect accurate information, we won’t be able to use it to make data-driven decisions.
How to create a traceability report in TestRail
TestRail supports requirement traceability through comprehensive traceability/coverage reports available under the Reports tab.
These reports give an overview of our requirement coverage. We can also see all bug reports for our test cases at a glance and get a detailed matrix of the relationships between requirements, test cases, and bug reports.
Most teams prefer to manage their requirements/user stories/feature requests within their issue tracker such as Jira, wiki software, or dedicated requirement management tools.
When you start building your traceability report in TestRail, you should first link any of these requirements from your external tool in the References field available on TestRail Test Case and Test Result artifacts.
Important: the following reports require that you are using the References field to link to your requirement IDs. You can learn more about the References field here.
Now, let’s see how we can use reports like Coverage for References, Summary for References, and Comparison for References reports to show the coverage for requirements/user stories.
- If you want to know which references have test cases associated with them and the test cases with/without references, you should opt for a Coverage for References report(especially during the test planning phase of your project).
- If your goal is to see some additional details like which references and their test cases have defects associated with them, then you should create a Summary for References report.
- And if you’re looking for details like how many test cases (associated with/without references) are in Passed, Failed, and other statuses, you should create a Comparison for References report.
How to create a traceability report in TestRail against Jira issues (or any other set of requirement IDs)
Coverage for References Report
By default, the Coverage for References report will only include the issues that are already linked via the References field in TestRail.
To report on coverage across your entire list of requirements in any requirement management tool, export a list of the issue IDs from your project (in your requirement management tool) and upload them to a TestRail using the following steps.
Let’s say you are using Jira to track your user stories or requirements. Start by exporting a list of the requirements as issue from your Jira Project as a CSV.
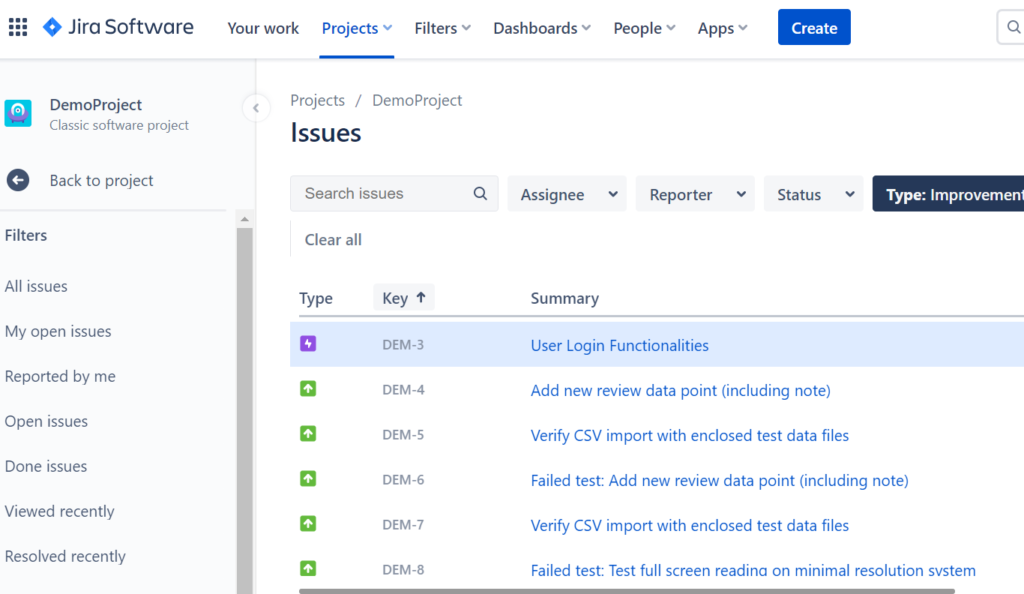
Once exported, copy the list of issue IDs from the CSV export. Then open a new Coverage for References report, and under the Report Options > References tab, select the radio button “The following references only.”
Then paste the list of issue IDs (which are called “References” in TestRail) into the text area.
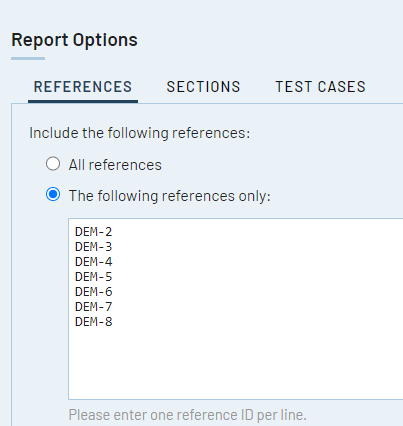
Then run the report! You will now see which Jira Issues have been associated with any test cases in TestRail.
If you believe you have already written the test cases you need to cover these requirements, but haven’t added the Reference IDs to the TestRail test cases themselves, you can do that now and rerun the report to check your updated coverage status. Otherwise, this report will help you identify which gaps you might currently have in your test plan and where you may need to write some additional test cases to achieve full coverage.
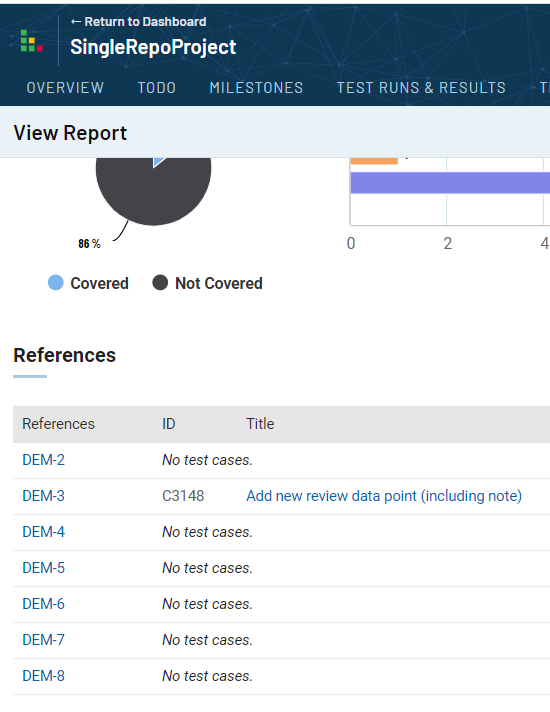
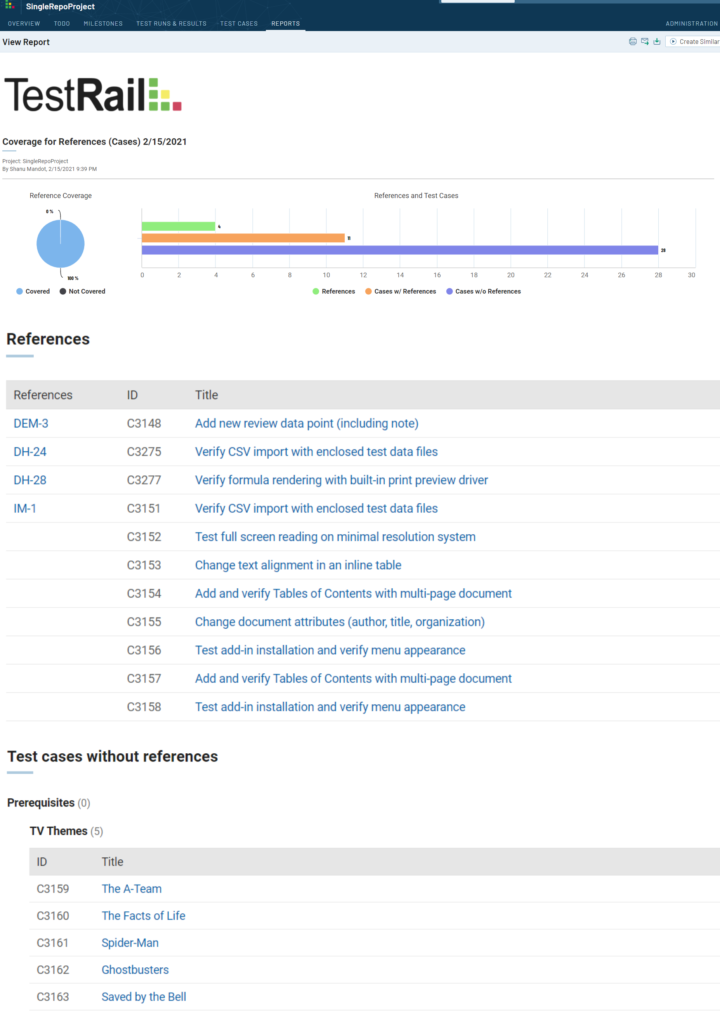
Coverage for References report will show the relationship between the references and the test cases. It will also show the test cases with or without references.
For example, see the screenshot below (References refer to the requirements we’ve linked to our TestRail test artifacts, and ID and Title refer to the test case ID and test case name respectively and blanks in the References column under IM-1 mean that IM-1 applies to all of those test cases.)
Summary for References Report
The Summary for References report will show a summary of defects you have found during testing and logged with your test results in TestRail. The report will show defect IDs you’ve entered during testing alongside your references and their test cases in a coverage matrix.
Note: The Summary for References Report will only show test cases and associated defects for test cases where you have specified a Reference as well.
If you entered test results with defect IDs for test cases and tests where you have not also specified a reference ID, that defect will not appear in this report.
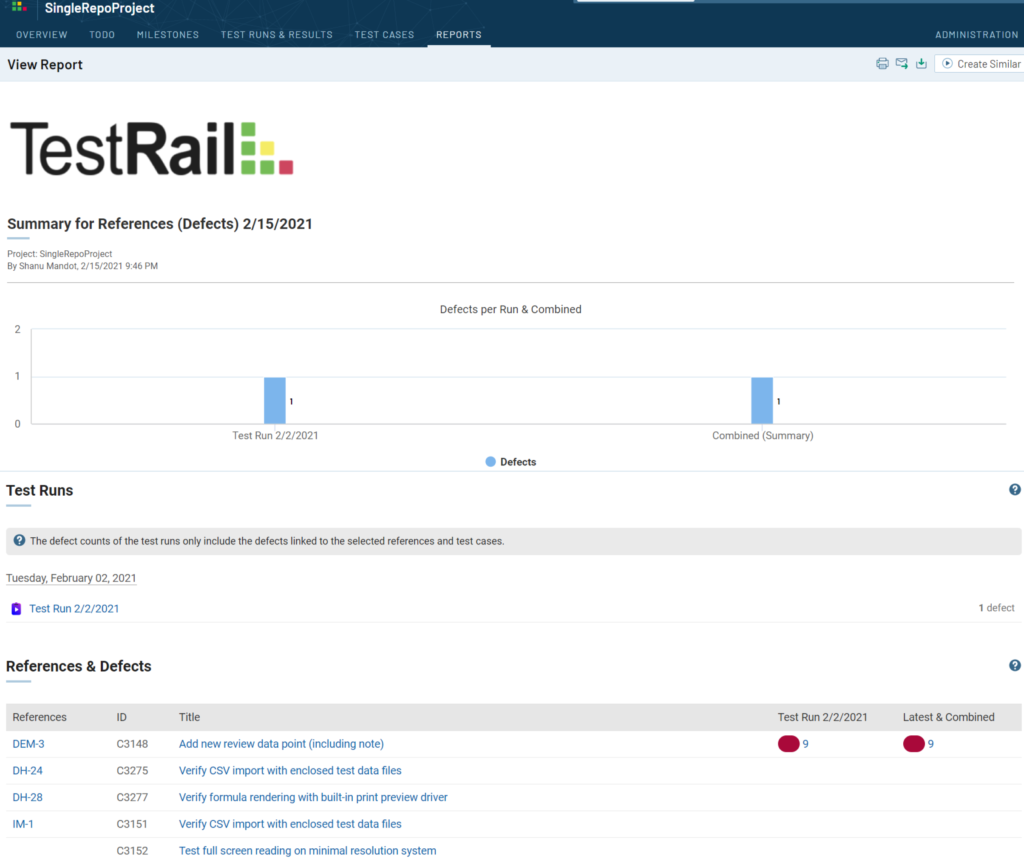
Here, References mean the requirements, and ID and Title refer to the test case ID and test case name respectively. Also, the red color shows the failed status of the test case with defect ID next to it.
Comparison for References Report
The Comparison for References report is perhaps the most important traceability report in TestRail and is the most similar to a traditional RTM.
In this report, you can compare the latest status of testing against your list of requirements to identify the overall progress of your testing, identify potential gaps in your testing underway, and triage any issues that have come up.
You will be able to see the latest status of tests run against various requirements from your project, as well as reveal if there are requirements that have yet to be tested. This way you can gain a more realistic sense of the coverage of your testing, evaluate the risks of deciding whether to keep testing or ship the product and reallocate resources as necessary to plug any coverage gaps.
You can have multiple runs/plans for the same suite/case repository active at the same time and this report will generate a matrix for the references/requirements/cases and test results. The Latest column shows the most recent test result (per test).
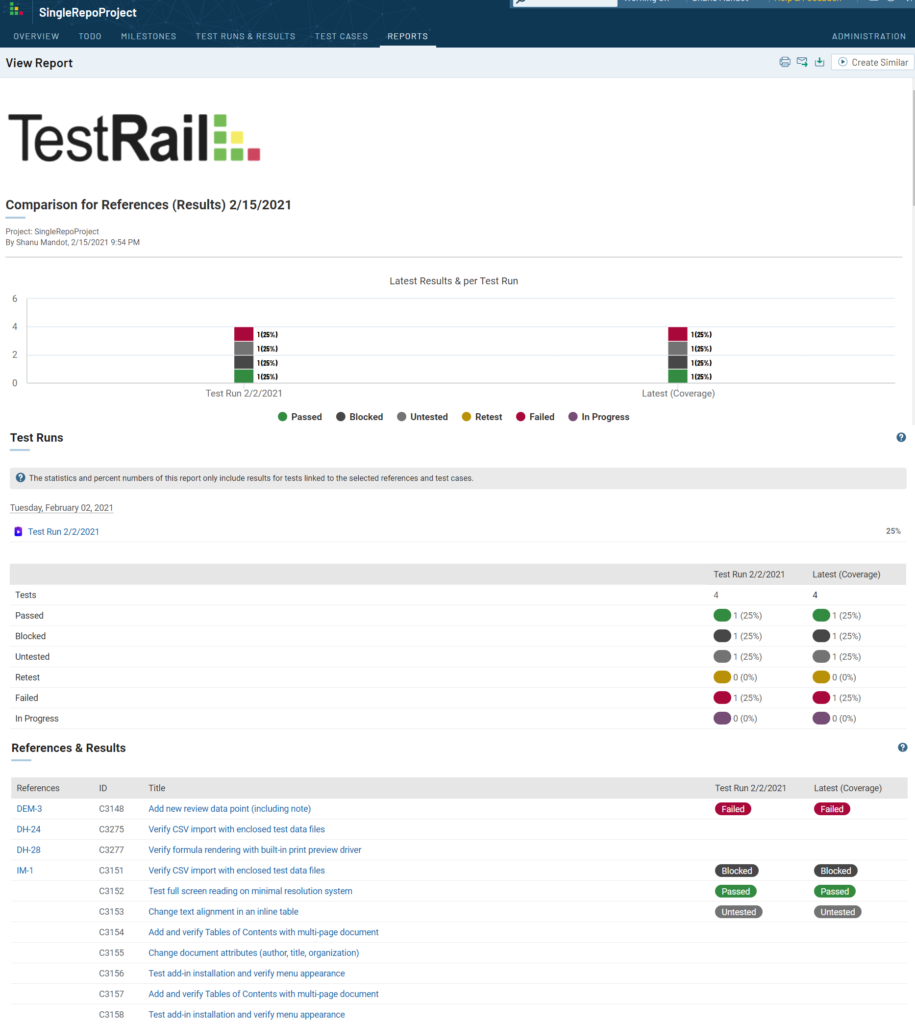
Here, References mean the requirements, and ID and Title refer to the test case ID and test case name respectively. Also, the test results and their corresponding color are shown with each test case and Reference ID.
Note: If multiple test cases are associated with the same requirement, the reference ID will not be copied for every row in this report to reduce clutter on screen. For example, in the above screenshot, test cases C3151, C3152, C3153, C3154, C3155, C3156, C3157, and C3158 are all associated with the same reference (issue): IM-1.
Conclusion
In the end, here are the top benefits of using TestRail Reports instead an RTM in Excel for reporting on traceability:
- With TestRail, you don’t have to copy and paste details from multiple systems into a single spreadsheet.
- TestRail allows you to visualize your coverage much more quickly. Instead of spending 4 hours assembling a complete spreadsheet of all of your requirements with their related test cases and defects, you can generate a report in less than 5 minutes.
- Because you can produce traceability reports so quickly in TestRail, it makes it much easier to track your coverage status throughout the lifecycle of your project, identify areas where you don’t have adequate coverage, and take action to avoid any decrease in quality.
- TestRail gives you the ability to report on traceability across multiple test runs, whereas a basic X/Y matrix only works for the simplest use case with a single test run and requires a substantial amount of work and time to update for future runs.
- TestRail integrates with 20+ requirements and bug-tracking tools like Jira, Azure DevOps work items, GitHub Issues, GitLab, and others to make it easier to automatically provide traceability no matter what tool you use.
- Last but not least, TestRail makes it easy for you to increase the visibility of your traceability and reduce the potential of there being a single point of failure by allowing you to schedule reports via the TestRail UI or programmatically generate them with the API, and share them with other team members via email as a PDF or HTML file.


